上一篇文章深入理解ActivityManagerService(一)AMS的启动流程 中了解了AMS启动的流程,接下来就来看下我们在开发中调用startActivity(Intent)发生了什么。
startActivity又要分为两种情况,一个是我们在应用中去启动本应用中的一个Activity(也称为子Activity),这个时候Activity所属的进程肯定是存在的,那么就启动Activity即可;还有一种情况是我们去启动另一个App中的Activity(也称为根Activity,以快捷图标的形式显示在Launcher中),那么就要先判断这个App的进程是否存在,如果不存在,就要先去请求Zygote创建应用程序进程。
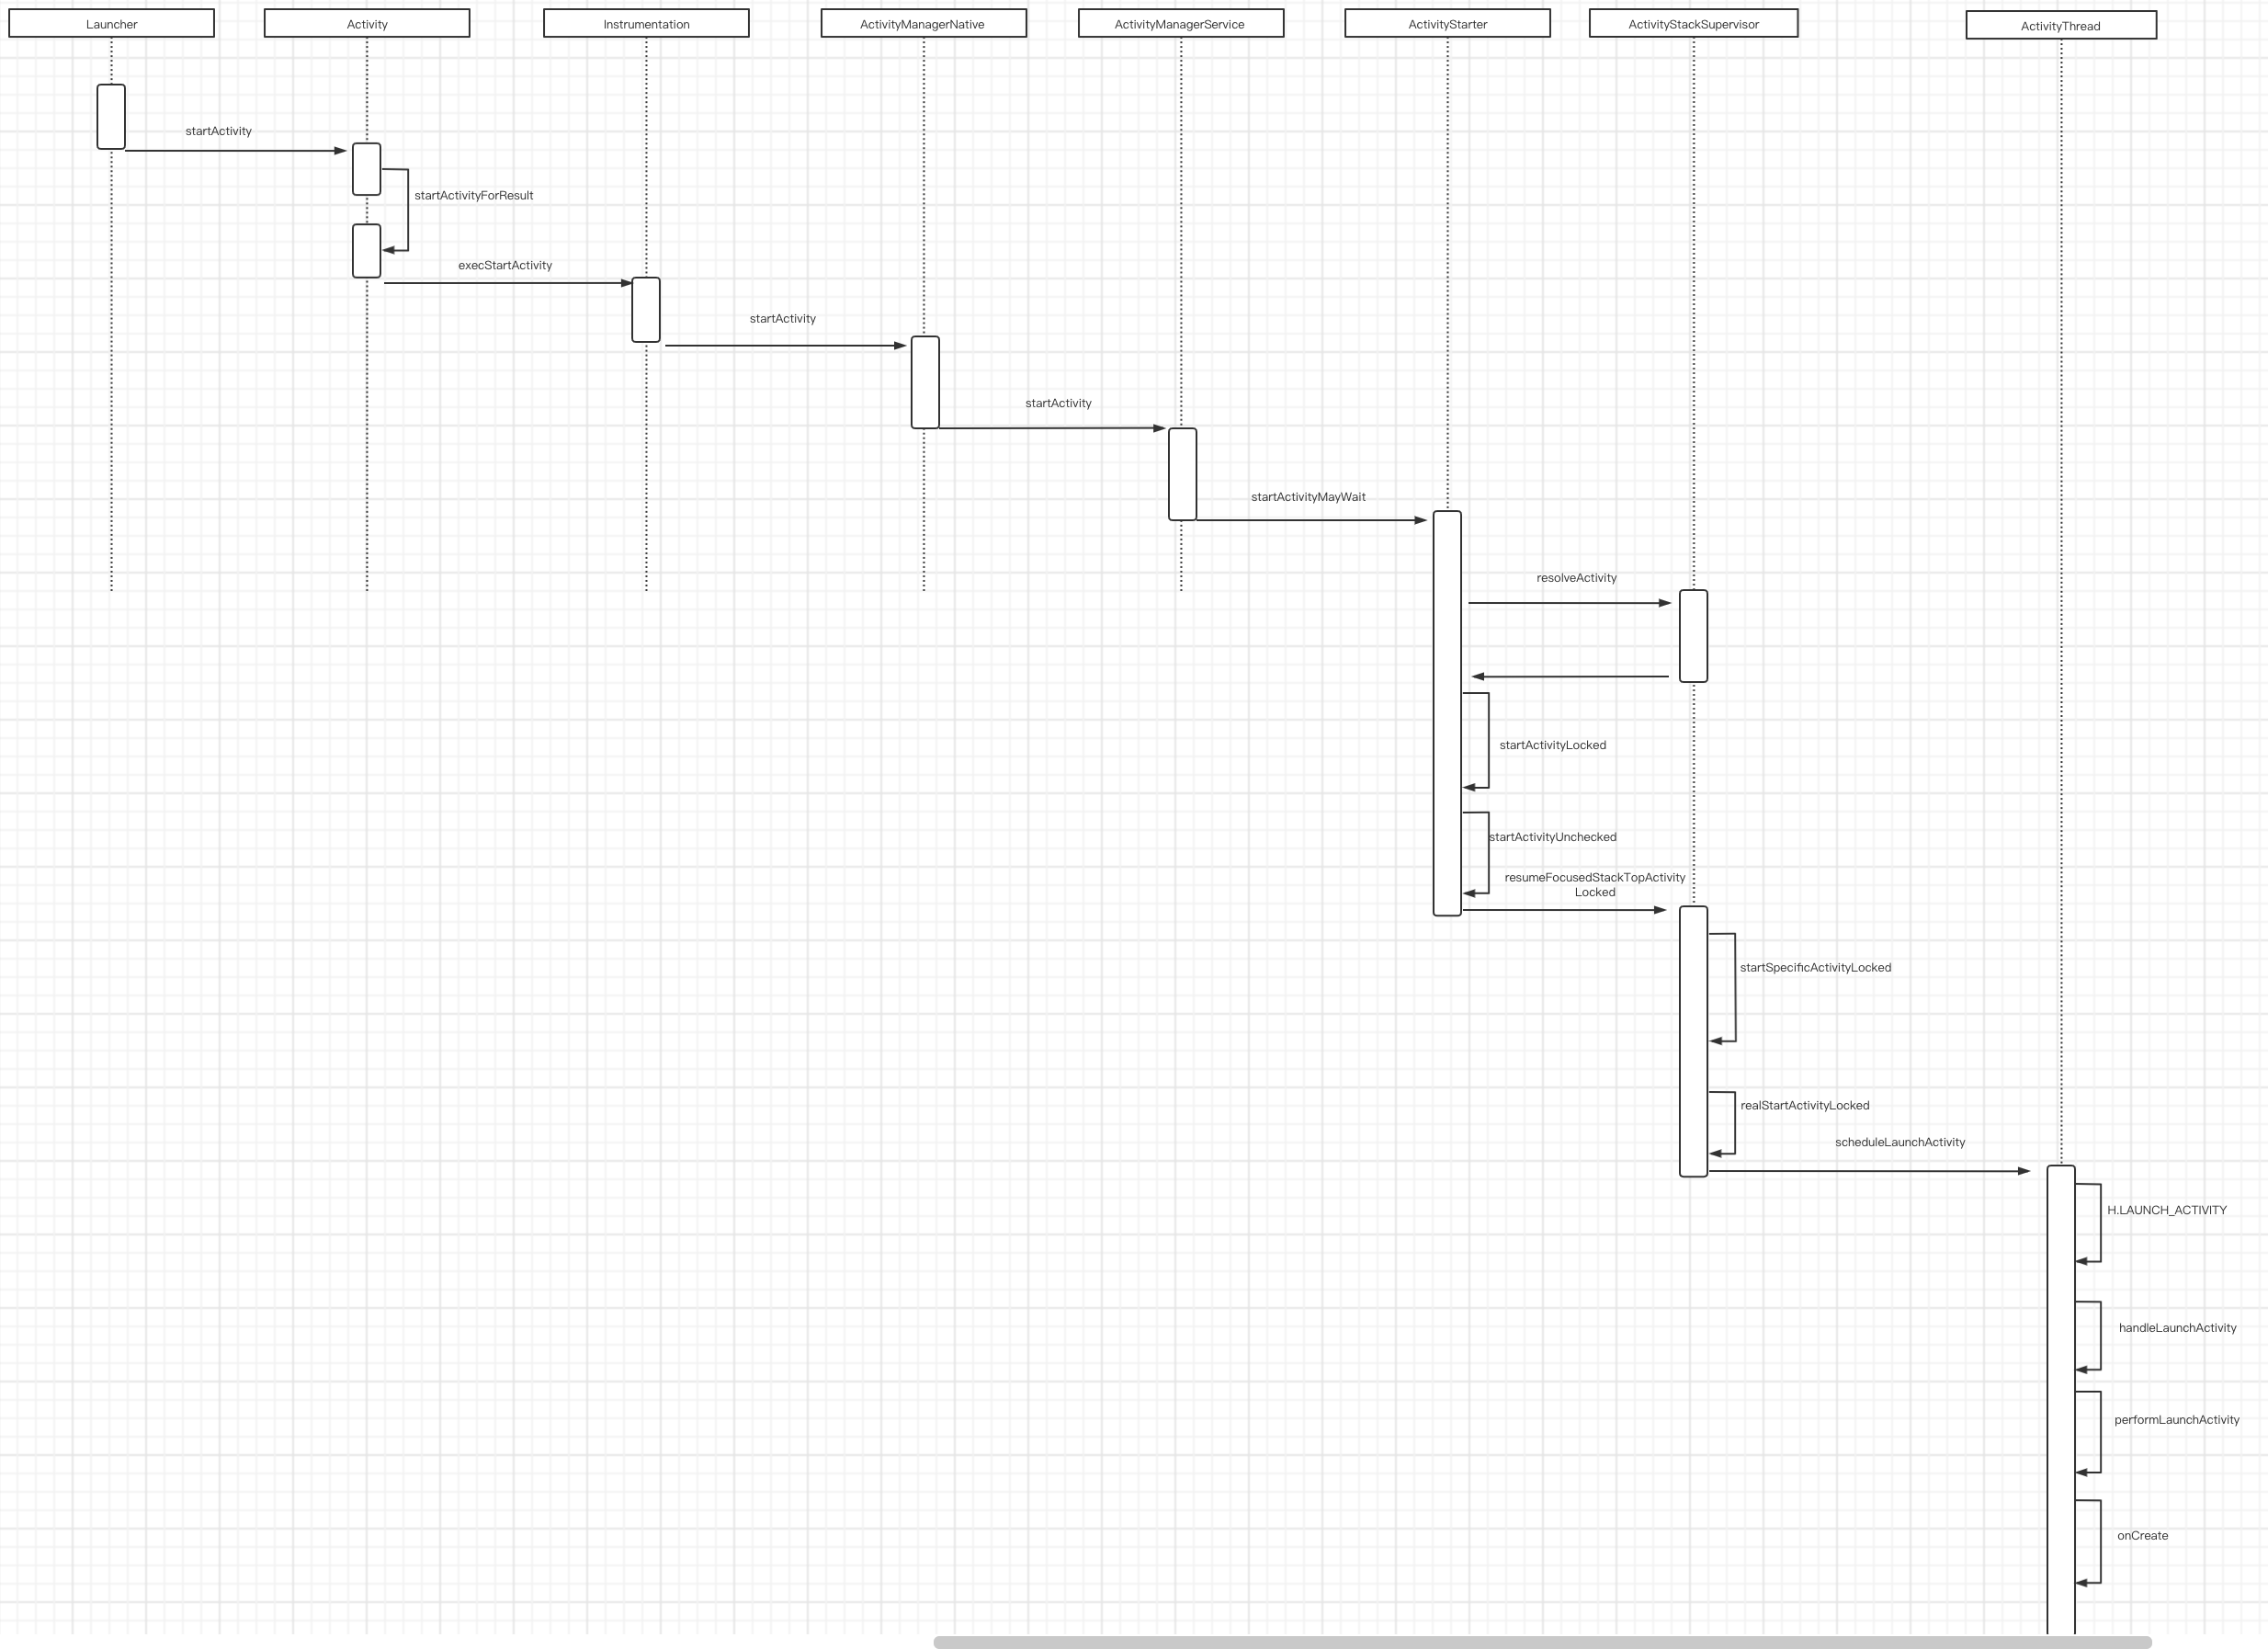
在Launcher中点击图标启动应用,都会调用startActivity方法
一、App层 1.Activity.startActivityForResult 1 2 3 4 5 6 7 8 9 10 11 12 13 14 15 16 17 18 19 @Override public void startActivity (Intent intent) this .startActivity(intent, null ); } @Override public void startActivity (Intent intent, @Nullable Bundle options) if (options != null ) { startActivityForResult(intent, -1 , options); } else { startActivityForResult(intent, -1 ); } } public void startActivityForResult (@RequiresPermission Intent intent, int requestCode) startActivityForResult(intent, requestCode, null ); }
可以看到startActivity实际还是调用了startActivityForResult函数,只是requestCode为-1。
1 2 3 4 5 6 7 8 9 10 11 12 13 14 15 16 17 18 19 20 21 22 23 24 25 26 27 28 29 public void startActivityForResult (@RequiresPermission Intent intent, int requestCode, @Nullable Bundle options) if (mParent == null ) { options = transferSpringboardActivityOptions(options); Instrumentation.ActivityResult ar = mInstrumentation.execStartActivity( this , mMainThread.getApplicationThread(), mToken, this , intent, requestCode, options); if (ar != null ) { mMainThread.sendActivityResult( mToken, mEmbeddedID, requestCode, ar.getResultCode(), ar.getResultData()); } if (requestCode >= 0 ) { mStartedActivity = true ; } cancelInputsAndStartExitTransition(options); } else { if (options != null ) { mParent.startActivityFromChild(this , intent, requestCode, options); } else { mParent.startActivityFromChild(this , intent, requestCode); } } }
2.Instrumentation.startActivity 1 2 3 4 5 6 7 8 9 10 11 12 13 14 15 16 17 18 19 20 21 22 23 24 25 26 27 public ActivityResult execStartActivity ( Context who, IBinder contextThread, IBinder token, Activity target, Intent intent, int requestCode, Bundle options) IApplicationThread whoThread = (IApplicationThread) contextThread; Uri referrer = target != null ? target.onProvideReferrer() : null ; if (referrer != null ) { intent.putExtra(Intent.EXTRA_REFERRER, referrer); } ...... try { intent.migrateExtraStreamToClipData(); intent.prepareToLeaveProcess(who); int result = ActivityManagerNative.getDefault() .startActivity(whoThread, who.getBasePackageName(), intent, intent.resolveTypeIfNeeded(who.getContentResolver()), token, target != null ? target.mEmbeddedID : null , requestCode, 0 , null , options); checkStartActivityResult(result, intent); } catch (RemoteException e) { throw new RuntimeException("Failure from system" , e); } return null ; }
从上面的代码中可以看到,关键代码就是 ActivityManagerNative.getDefault().startActivity方法。
Android 8.0之前是通过ActivityManagerNative.getDefault()获取ActivityManagerProxy,即AMS的代理类,之后就通过AMP与AMS进行通信,8.0之后这里就不再使用ActivityManagerProxy,而是ActivityManager通过AIDL直接与AMS交互。
3.ActivityManagerNative.startActivity frameworks/base/core/java/android/app/ActivityManagerNative.java
1 2 3 4 5 6 7 8 9 10 11 12 13 14 15 16 17 static public IActivityManager getDefault () return gDefault.get(); } private static final Singleton<IActivityManager> gDefault = new Singleton<IActivityManager>() { protected IActivityManager create () IBinder b = ServiceManager.getService("activity" ); if (false ) { Log.v("ActivityManager" , "default service binder = " + b); } IActivityManager am = asInterface(b); if (false ) { Log.v("ActivityManager" , "default service = " + am); } return am; } };
getDefault会调用一个Singleton类gDefault的get函数。首先通过ServiceManager获取名为”activity”的Service引用,也就是IBinder类型的AMS的引用。然后将其封装为AMP对象,并将它保存到gDefault中,此后调用AMN的getDefault方法就会直接获得AMS的代理对象AMP。
frameworks/base/core/java/android/app/ActivityManagerNative.java
1 2 3 4 5 6 7 8 9 10 11 12 static public IActivityManager asInterface (IBinder obj) if (obj == null ) { return null ; } IActivityManager in = (IActivityManager)obj.queryLocalInterface(descriptor); if (in != null ) { return in; } return new ActivityManagerProxy(obj); }
然后startActivity,实际调用的就是ActivityManagerProxy的startActivity函数,与上面new ActivityManagerProxy(obj);对应。
1 2 3 4 5 6 7 8 9 10 11 12 13 14 15 16 17 18 19 20 21 22 23 24 25 26 27 28 29 30 31 32 33 34 35 36 37 38 39 40 41 42 43 44 45 46 47 48 49 class ActivityManagerProxy implements IActivityManager public ActivityManagerProxy (IBinder remote) { mRemote = remote; } public IBinder asBinder () { return mRemote; } public int startActivity (IApplicationThread caller, String callingPackage, Intent intent, String resolvedType, IBinder resultTo, String resultWho, int requestCode, int startFlags, ProfilerInfo profilerInfo, Bundle options) throws RemoteException Parcel data = Parcel.obtain(); Parcel reply = Parcel.obtain(); data.writeInterfaceToken(IActivityManager.descriptor); data.writeStrongBinder(caller != null ? caller.asBinder() : null ); data.writeString(callingPackage); intent.writeToParcel(data, 0 ); data.writeString(resolvedType); data.writeStrongBinder(resultTo); data.writeString(resultWho); data.writeInt(requestCode); data.writeInt(startFlags); if (profilerInfo != null ) { data.writeInt(1 ); profilerInfo.writeToParcel(data, Parcelable.PARCELABLE_WRITE_RETURN_VALUE); } else { data.writeInt(0 ); } if (options != null ) { data.writeInt(1 ); options.writeToParcel(data, 0 ); } else { data.writeInt(0 ); } mRemote.transact(START_ACTIVITY_TRANSACTION, data, reply, 0 ); reply.readException(); int result = reply.readInt(); reply.recycle(); data.recycle(); return result; } ...... }
1 2 3 4 5 6 7 8 9 10 11 12 13 14 15 16 17 18 19 20 21 22 23 24 25 26 public boolean onTransact (int code, Parcel data, Parcel reply, int flags) throws RemoteException { switch (code) { case START_ACTIVITY_TRANSACTION: { data.enforceInterface(IActivityManager.descriptor); IBinder b = data.readStrongBinder(); IApplicationThread app = ApplicationThreadNative.asInterface(b); String callingPackage = data.readString(); Intent intent = Intent.CREATOR.createFromParcel(data); String resolvedType = data.readString(); IBinder resultTo = data.readStrongBinder(); String resultWho = data.readString(); int requestCode = data.readInt(); int startFlags = data.readInt(); ProfilerInfo profilerInfo = data.readInt() != 0 ? ProfilerInfo.CREATOR.createFromParcel(data) : null ; Bundle options = data.readInt() != 0 ? Bundle.CREATOR.createFromParcel(data) : null ; int result = startActivity(app, callingPackage, intent, resolvedType, resultTo, resultWho, requestCode, startFlags, profilerInfo, options); reply.writeNoException(); reply.writeInt(result); return true ; }
最终在ActivityManagerNative中调用AMS的startActivity函数,接下来就交给AMS来处理逻辑。
二、System Server层 1. ActivityManagerService.startActivity frameworks/base/services/core/java/com/android/server/am/ActivityManagerService.java
1 2 3 4 5 6 7 8 @Override public final int startActivity (IApplicationThread caller, String callingPackage, Intent intent, String resolvedType, IBinder resultTo, String resultWho, int requestCode, int startFlags, ProfilerInfo profilerInfo, Bundle bOptions) return startActivityAsUser(caller, callingPackage, intent, resolvedType, resultTo, resultWho, requestCode, startFlags, profilerInfo, bOptions, UserHandle.getCallingUserId()); }
1 2 3 4 5 6 7 8 9 10 11 12 @Override public final int startActivityAsUser (IApplicationThread caller, String callingPackage, Intent intent, String resolvedType, IBinder resultTo, String resultWho, int requestCode, int startFlags, ProfilerInfo profilerInfo, Bundle bOptions, int userId) enforceNotIsolatedCaller("startActivity" ); userId = mUserController.handleIncomingUser(Binder.getCallingPid(), Binder.getCallingUid(), userId, false , ALLOW_FULL_ONLY, "startActivity" , null ); return mActivityStarter.startActivityMayWait(caller, -1 , callingPackage, intent, resolvedType, null , null , resultTo, resultWho, requestCode, startFlags, profilerInfo, null , null , bOptions, false , userId, null , null ); }
AMS中调用ActivityStarter中的startActivityMayWait函数
2. ActivityStarter.startActivityMayWait frameworks/base/services/core/java/com/android/server/am/ActivityStarter.java
1 2 3 4 5 6 7 8 9 10 11 12 13 14 15 16 17 18 19 20 21 22 23 24 25 26 27 28 29 30 31 32 33 34 35 36 37 38 39 40 41 42 43 final int startActivityMayWait (IApplicationThread caller, int callingUid, int requestRealCallingPid, int requestRealCallingUid, String callingPackage, Intent intent, String resolvedType, IVoiceInteractionSession voiceSession, IVoiceInteractor voiceInteractor, IBinder resultTo, String resultWho, int requestCode, int startFlags, ProfilerInfo profilerInfo, IActivityManager.WaitResult outResult, Configuration config, Bundle bOptions, boolean ignoreTargetSecurity, int userId, IActivityContainer iContainer, TaskRecord inTask) final Intent ephemeralIntent = new Intent(intent); intent = new Intent(intent); ResolveInfo rInfo = mSupervisor.resolveIntent(intent, resolvedType, userId); ActivityInfo aInfo = mSupervisor.resolveActivity(intent, rInfo, startFlags, profilerInfo); ...... final ActivityRecord[] outRecord = new ActivityRecord[1 ]; int res = startActivityLocked(caller, intent, ephemeralIntent, resolvedType, aInfo, rInfo, voiceSession, voiceInteractor, resultTo, resultWho, requestCode, callingPid, callingUid, callingPackage, realCallingPid, realCallingUid, startFlags, options, ignoreTargetSecurity, componentSpecified, outRecord, container, inTask); Binder.restoreCallingIdentity(origId); if (stack.mConfigWillChange) { ... } if (outResult != null ) { ... } final ActivityRecord launchedActivity = mReusedActivity != null ? mReusedActivity : outRecord[0 ]; mSupervisor.mActivityMetricsLogger.notifyActivityLaunched(res, launchedActivity); return res; } }
在这个流程中就是用ActivityStackSupervisor的resolveIntent()和resolveActivity()来找到相应的Activity组件, 然后再进入startActivityLocked()
2.1 ActivityStackSupervisor.resolveActivity frameworks/base/services/core/java/com/android/server/am/ActivityStackSupervisor.java
1 2 3 4 5 6 7 8 9 10 11 12 13 14 15 16 17 18 19 20 21 22 23 24 25 26 27 28 29 30 31 32 33 34 35 36 37 38 39 40 41 42 43 44 45 46 47 48 49 50 51 52 ActivityInfo resolveActivity (Intent intent, ResolveInfo rInfo, int startFlags, ProfilerInfo profilerInfo) final ActivityInfo aInfo = rInfo != null ? rInfo.activityInfo : null ; if (aInfo != null ) { intent.setComponent(new ComponentName( aInfo.applicationInfo.packageName, aInfo.name)); if (!aInfo.processName.equals("system" )) { if ((startFlags & ActivityManager.START_FLAG_DEBUG) != 0 ) { mService.setDebugApp(aInfo.processName, true , false ); } if ((startFlags & ActivityManager.START_FLAG_NATIVE_DEBUGGING) != 0 ) { mService.setNativeDebuggingAppLocked(aInfo.applicationInfo, aInfo.processName); } if ((startFlags & ActivityManager.START_FLAG_TRACK_ALLOCATION) != 0 ) { mService.setTrackAllocationApp(aInfo.applicationInfo, aInfo.processName); } if (profilerInfo != null ) { mService.setProfileApp(aInfo.applicationInfo, aInfo.processName, profilerInfo); } } } return aInfo; } ResolveInfo resolveIntent (Intent intent, String resolvedType, int userId) { return resolveIntent(intent, resolvedType, userId, 0 ); } ResolveInfo resolveIntent (Intent intent, String resolvedType, int userId, int flags) { try { return AppGlobals.getPackageManager().resolveIntent(intent, resolvedType, PackageManager.MATCH_DEFAULT_ONLY | flags | ActivityManagerService.STOCK_PM_FLAGS, userId); } catch (RemoteException e) { } return null ; } ActivityInfo resolveActivity (Intent intent, String resolvedType, int startFlags, ProfilerInfo profilerInfo, int userId) final ResolveInfo rInfo = resolveIntent(intent, resolvedType, userId); return resolveActivity(intent, rInfo, startFlags, profilerInfo); }
在ActivityStackSupervisor中调用PackageManagerService去解析Intent,来查询系统中所有符合要求的Activity,当存在多个满足条件的Activity则会弹框让用户来选择。
2.2 PMS.resolveIntent frameworks/base/services/core/java/com/android/server/pm/PackageManagerService.java
1 2 3 4 5 6 7 8 9 10 11 12 13 14 15 16 17 @Override public ResolveInfo resolveIntent (Intent intent, String resolvedType, int flags, int userId) flags = updateFlagsForResolve(flags, userId, intent); enforceCrossUserPermission(Binder.getCallingUid(), userId, false , false , "resolve intent" ); Trace.traceBegin(TRACE_TAG_PACKAGE_MANAGER, "queryIntentActivities" ); final List<ResolveInfo> query = queryIntentActivitiesInternal(intent, resolvedType, flags, userId); Trace.traceEnd(TRACE_TAG_PACKAGE_MANAGER); final ResolveInfo bestChoice = chooseBestActivity(intent, resolvedType, flags, query, userId); return bestChoice; }
2.3 PMS.queryIntentActivities 1 2 3 4 5 6 7 8 9 10 11 12 13 14 15 16 17 18 19 20 21 22 23 24 public List<ResolveInfo> queryIntentActivities (Intent intent, String resolvedType, int flags, int userId) ... ComponentName comp = intent.getComponent(); if (comp == null ) { if (intent.getSelector() != null ) { intent = intent.getSelector(); comp = intent.getComponent(); } } if (comp != null ) { final List<ResolveInfo> list = new ArrayList<ResolveInfo>(1 ); final ActivityInfo ai = getActivityInfo(comp, flags, userId); if (ai != null ) { final ResolveInfo ri = new ResolveInfo(); ri.activityInfo = ai; list.add(ri); } return list; } ... }
3. ActivityStarter.startActivityLocked 1 2 3 4 5 6 7 8 9 10 11 12 13 14 15 16 17 18 19 20 21 22 23 24 final int startActivityLocked (IApplicationThread caller, Intent intent, Intent ephemeralIntent, String resolvedType, ActivityInfo aInfo, ResolveInfo rInfo, IVoiceInteractionSession voiceSession, IVoiceInteractor voiceInteractor, IBinder resultTo, String resultWho, int requestCode, int callingPid, int callingUid, String callingPackage, int realCallingPid, int realCallingUid, int startFlags, ActivityOptions options, boolean ignoreTargetSecurity, boolean componentSpecified, ActivityRecord[] outActivity, ActivityStackSupervisor.ActivityContainer container, TaskRecord inTask) int err = ActivityManager.START_SUCCESS; ...... doPendingActivityLaunchesLocked(false ); try { mService.mWindowManager.deferSurfaceLayout(); err = startActivityUnchecked(r, sourceRecord, voiceSession, voiceInteractor, startFlags, true , options, inTask); } finally { mService.mWindowManager.continueSurfaceLayout(); } postStartActivityUncheckedProcessing(r, err, stack.mStackId, mSourceRecord, mTargetStack); return err; }
4. ActivityStarter.startActivityUnchecked 1 2 3 4 5 6 7 8 private int startActivityUnchecked (final ActivityRecord r, ActivityRecord sourceRecord, IVoiceInteractionSession voiceSession, IVoiceInteractor voiceInteractor, int startFlags, boolean doResume, ActivityOptions options, TaskRecord inTask) ... mSupervisor.resumeFocusedStackTopActivityLocked(); ... return START_SUCCESS; }
5. ActivityStackSupervisor.resumeFocusedStackTopActivityLocked 1 2 3 4 5 6 7 8 9 10 11 boolean resumeFocusedStackTopActivityLocked ( ActivityStack targetStack, ActivityRecord target, ActivityOptions targetOptions) if (targetStack != null && isFocusedStack(targetStack)) { return targetStack.resumeTopActivityUncheckedLocked(target, targetOptions); } final ActivityRecord r = mFocusedStack.topRunningActivityLocked(); if (r == null || r.state != RESUMED) { mFocusedStack.resumeTopActivityUncheckedLocked(null , null ); } return false ; }
6. ActivityStack.resumeTopActivityUncheckedLocked 1 2 3 4 5 6 private boolean resumeTopActivityInnerLocked (ActivityRecord prev, ActivityOptions options) ... mStackSupervisor.startSpecificActivityLocked(next, true , true ); } if (DEBUG_STACK) mStackSupervisor.validateTopActivitiesLocked(); return true ;
7. ActivityStackSupervisor.startSpecificActivityLocked 1 2 3 4 5 6 7 8 9 10 11 12 13 14 15 16 17 18 19 20 21 22 23 24 void startSpecificActivityLocked (ActivityRecord r, boolean andResume, boolean checkConfig) ProcessRecord app = mService.getProcessRecordLocked(r.processName, r.info.applicationInfo.uid, true ); r.task.stack.setLaunchTime(r); if (app != null && app.thread != null ) { try { if ((r.info.flags&ActivityInfo.FLAG_MULTIPROCESS) == 0 || !"android" .equals(r.info.packageName)) { app.addPackage(r.info.packageName, r.info.applicationInfo.versionCode, mService.mProcessStats); } realStartActivityLocked(r, app, andResume, checkConfig); return ; } catch (RemoteException e) { Slog.w(TAG, "Exception when starting activity " + r.intent.getComponent().flattenToShortString(), e); } } mService.startProcessLocked(r.processName, r.info.applicationInfo, true , 0 , "activity" , r.intent.getComponent(), false , false , true ); }
累啊,看了半天终于到关键的地方了。
根据进程名称获取进程信息,如果进程存在,才到真正去启动Activity的地方,启动子Activity也就是在应用中启动其他Activity页面就会走这里。而进程如果不存在,就要走下面 mService.startProcessLocked去创建一个进程。还有可能是新创建的Activity被定义到一个新的进程,即定义了android:process,这样也会创建一个新的进程。
进程创建最终是由Zygote fork出一个进程,在Android中所有的App进程都是由Zygote进程fork生成的。这个流程也是很复杂,这里就不继续看下去了,我们先看下启动Activity的流程。
8. ActivityStackSupervisor.realStartActivityLocked 1 2 3 4 5 6 7 8 9 10 11 12 13 final boolean realStartActivityLocked (ActivityRecord r, ProcessRecord app, boolean andResume, boolean checkConfig) throws RemoteException ...... app.thread.scheduleLaunchActivity(new Intent(r.intent), r.appToken, System.identityHashCode(r), r.info, new Configuration(mService.mConfiguration), new Configuration(task.mOverrideConfig), r.compat, r.launchedFromPackage, task.voiceInteractor, app.repProcState, r.icicle, r.persistentState, results, newIntents, !andResume, mService.isNextTransitionForward(), profilerInfo); ...... return true ; }
关键代码app.thread.scheduleLaunchActivity,这里我们认为App进程已经启动了,AMS中已经有了对应进程的ProcessRecord。
app.thread类型为IApplicationThread,可以远程调用到ActivityThread的scheduleLaunchActivity方法,再发送H.LAUNCH_ACTIVITY消息,最终反射生成一个Activity。具体可见Android系统-理解ActivityThread和App启动流程
9.调用流程